V. THE PAINTED SURFACE
As mentioned in the previous section, the only area of reconditioning that is complex at all is the exterior surface of an automobile, and even this is made more complex than it actually is. This process consists of making two basic decisions:
Deciding what stage of deterioration the finish is in 'V Deciding what class of products to begin the reconditioning process with. In trying to make the first decision, it helps to understand how a car is painted. You begin with bare metal which is then covered by a primer coat, which is then covered by several layers of paint. In deciding what stage of deterioration the finish is in, you must look at two factors:
- The degree of oxidation; and
- The depth of scratches
As paint deteriorates from weathering (oxidation), the first level of paint is attacked, if left untreated the second level is attacked and then the third and finally the primer. As each level of paint is attacked, it loses its oil and becomes white and flaky or dull and dry looking.
A car's finish can be scratched in many ways, but what's important is trying to determine the depth of these scratches. Th"y range from simple surface scratches to scratches that go down to bare metal. The stages of deterioration can be categorized as follows:
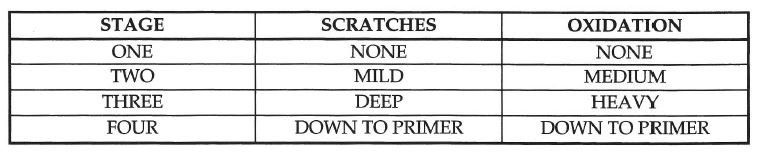
Scratches or oxidation, can place the finish in a higher stage of deterioration. For example, you might have no oxidation with deep scratches and your finish would be in Stage Three. Once you have placed the finish into a stage of deterioration, you must decide what type of product to begin with. The key to your choice lies in knowing what each product you have actually does. Every buffing product that has any abrasive in it (almost all have some) does two things:
Replaces the lost oils in the paint or restores color (sometimes called feeding the paint).
Removes and smoothes paint.
To deal with any problem other than Stage One - no scratches and no oxidation/ you must work with a product that replaces the oils restores color) and removes some paint. Since all buffing products restore oil, the only choice lies in the degree of abrasiveness or to put it another way how much paint the product will remove.
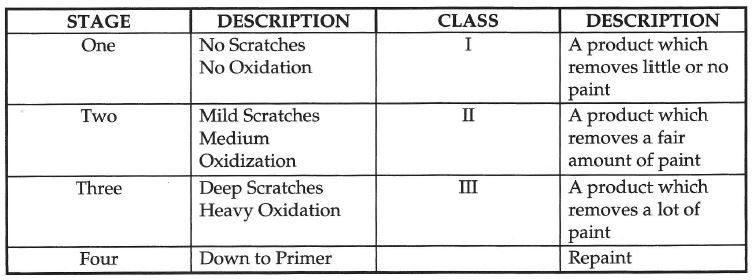
From this discussion, it is obvious that the most important information that you can know about any product is its degree of abrasiveness. You can break all buffing and polishing products into the following categories, according to their cutting power:
Class 1: Products which remove little or no paint are usually called waxes, polishes, glazes, or sealers - usually recommended for hand application or orbital polishers.
Class 2: Mild and Medium Cutters which remove a fair amount of paint - usually called cleaners, cleaner and glazes, color brighteners, one shots, machine glazes, and machine cleaners - usually recommended for orbital polishers or polishers of a slow speed.
Class 3: Heavy Cutters which remove a lot of paint are usually called compounds, heavy or extra heavy duty cleaners and fast cut - usually recommended for high speed polishers.
Once you have categorized your products, you can match up the stage of deterioration with the degree of abrasiveness you need to solve the problem, i.e. the product you need to start with.
DETERMINE CHOICE
In making your choice of what product to start with, remember the following:
1. A car has a limited amount of paint and you never want to remove more paint than is necessary to get the job done. If you err, do so on the side of choosing a product with not enough cutting power to do the job, you can always move up if you have to.
If you have a Stage Three car with only one or two deep scratches, you probably want to use a Class 2 product that will remove a limited amount of paint and try to blend the deep scratches instead of trying to remove them.
It is very difficult to tell by looking whether or not you are at Level Three of the paint. If you go through Level Three, you are at the primer level and the car has to be repainted. If repainting is not an option and you are just trying to d"o the best job you can with the paint that is left, then you must be careful not to go through Level Three.
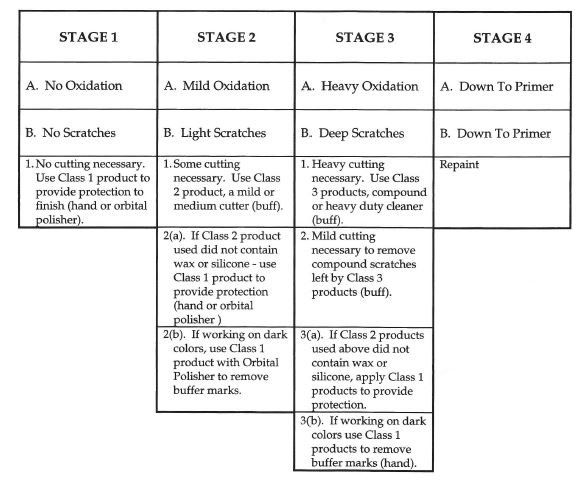
Assume that you have correctly assessed the condition of the finish and chosen the correct product class. After this everything else is predetermined. For example if you determined that your finish was Stage Three finish - heavy oxidation and deep scratches, you would have a two or three step process, depending on the color of the car and whether or not the product you used in Step 2 provided a protective coating.
STAGE III FINISH
Step I
Use a heavy duty cleaner or rubbing compound - Class 3 - Heavy Cutters - to cut paint down below heavy oxidation and deep scratches.
Step 2
Use a Class 2 product to remove light scratches left by Class 3 products, . and to produce a high shine on the finish.
Step 3
The purpose of Step 3 is two fold:
1. To provide a protective coating where the product used in Step II did not contain wax or silicone.
2. To remove buffer marks on dark colored cars caused by buffing in Step 2. Step 3 is not necessary if you are working on a light colored car (as they do not show buffer marks as much) as you used a product in Step 2 which provided a protective coating.
In summary, you begin the whole process by looking at the finish to decide whether or not it needs compounding. Once this decision is made, everything else follows and only differs depending on your choice of products or the color of the car.